Monday, May 23, 2011

Quickie Craft!


As a birthday gift, I bought Zaiah these two fun little projects for her to get crafty and creative. We had a crazy weekend so when things had calmed, we took some time out to relax and work on one of these little crafts, an adorable little Tinkerbell birdhouse. Together we painted all the wooden pieces and then we added stickers and glitter and gems. Then we glued all the pieces together.  

Painting Away
Drying our crafts
My munchkin filled her birdhouse with breadcrumbs and then we hung it out for birdies to eat!


 She was so excited and proud of her little birdhouse and it was a fun mommy and daughter activity!

Sunday, May 22, 2011

Make It and Love It {This Week's Bloggy Fav}

I follow A LOT of blogs ...A LOT of crafting blogs alone.  Of all of the blogs that I follow, this blog is by far one of my favorites!! Make It and Love It encompasses all types of craftiness.  It feeds my hunger for sewing, glueing, Mod Podgeing, cooking, decorating, and so much more. When bookmarking projects to work on, some of my favorites hail from Make It and Love It. Here is a sneak peek into this super fun blog!


Baby Crafts
Many babies are headed my way in 2011 and Make It and Love It has already assisted in filling my baby shower gift bag.


DIY Home Decor


Mod Podge


Sewing


There are knitting "classes" and cooking and recipes and so much more. This blog is chocked full of tutorials and tips that teach you step by step how to make these amazing crafts and projects.

Make sure to stop by and check out Make It and Love It and follow along in the fun!!  And don't forget to grab a button!!


<a href="http://www.makeit-loveit.com/" target="_blank"><img src="http://i428.photobucket.com/albums/qq3/allmystuff2008/th_blogbutton2.jpg" border="0" alt="" ></a>

~Nik

Wednesday, May 18, 2011

Strawberry Celebrating aka Why I Gave Up Caking on the Regular

This weekend our little Moon baby turned three!! Our angel is three years old! So to celebrate our little girl, we had a Strawberry Celebration. She insisted on throwing Strawberry Shortcake in there so I added her in with some extra party hats, confetti, favors, and balloons. It was a Strawberry Jamboree!

Now I make my baby's cake every year and it has to be decorated the same day as the event, but it always ALWAYS puts me way behind schedule. It takes me hours to finish the cake and then I never get everything done and end up not doing certain things at the party or making use of all the crafts I spent weeks making.  This year was no different and lots of details were passed over but there were lots of little fun details that we all enjoyed and the cake, although rushed and slightly crooked, lol, came out kinda cute too.

I got the main table layout idea from one of my favorite blogs, Glorious Treats. Mine didn't come out nearly as cute as I had to use plastic tablecloths and it was the coldest windiest day, so the tablecloths and bows kept going crooked but everyone loved it still!


I got all of my printables from DimplePrints and they also provided the very cute invitations and thank you notes. There were signs and banners, water bottle labels, and the cupcake toppers that were completely adorable.


...and of course there were the party hats with the homemade pom-poms. I love my baby's "no more pics" face in this picture.


The menu consisted of all food strawberries. Strawberry-Chipotle Chicken and Strawberry Caprese Pasta Salad. There were Strawberry Cupcakes. (Thanks to the lovely Debbie for icing them for me :)).  Fondant leaves and strawberries were provided by Emmyluucakes and the cupcake liners (and straws shown in the tablescape photo) were provided by HeyYoYo.


...and homemade Strawberry Marshmallows (thanks again to Debbie for cutting them up and getting them out for all to enjoy ;)).


Then there was the cake. Two layers of strawberry and one vanilla. 


Each table was adorned with these great cupcake liner topiaries.  The tutorial can be found here.


The two games were supposed to be Musical Fruits which is the same as musical chairs except instead of chairs, there are pictures of fruits and berries.  The second game was a berry version of Pin the Tail on the Donkey where the kids had to stick the strawberries in the basket blindfolded. The prizes came in these strawberry bags found at the dollar store.


But things got a little hectic and the games never got played :(  But nevertheless, the kids went home with lots of goodies.  The goodie tins were filled with small strawberry plants for the kids to grow, strawberry shortcake favors, blowers, strawberry fruit roll ups, and lots of candy. The favor tags were part of the printable package.


And, of course, everyone got to bring home their own container of strawberries!


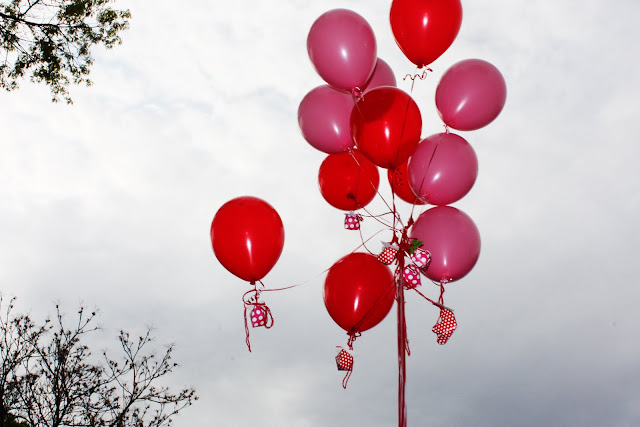
...and before sending the kids home we all made Strawberry Wishes. Every child got a strawberry favor box and a piece of paper on which they wrote their wishes and then placed them inside the box. We tied each wish box onto a balloon, tied the balloons together, and my little girl let them go for their wishes to come true!!


The final strawberry touch was my daughter's dress! Her dress was beautiful and handmade by Boutique Elli'Ette. I loved it and it fit her perfectly and she looked like a little Strawberry Moon Princess ;)


All in all, it was a fun-filled day and I had a blast making all the little berry decorations!  Make sure and check out all the great Etsy stores and blogs that helped me put together our berry exciting day!!

~Nik

Wednesday, April 20, 2011

Funny Bunnies


I first came across these little treasures when hanging out in The Idea Room Community when guest blogger Little Eme posted this lovely tutorial.  I knew that I wanted to make one of these for my little girl but I figured it would be somewhere down the line since I hadnt touched a sewing machine since I was much younger.  But when Easter rolled around, I figured it was the perfect opportunity to make these little guys and  make them accessories to my easter baskets. 

But the sewing... oh the sewing. I had just purchased SEW workshop by to re-teach myself to sew and had also purchased my whole sewing kit but had yet to dust off the Singer. So instead of starting small, I decided to dive right in. I threaded that bad boy, which was a task in itself for a novice who didn't know enough about adjusting tension.  But I got it done!

The tutorial posted by Little Eme says that each of these bunnies should take about an hour and a half... It took me hours just to make one, lol. But like I said, I got it done and although their legs and arms arent completely even and their little bunny ears hang a little too far to the side, I love them!! ...and I hope the getters of these gifts will enjoy them as much as I do and treasure their cute little handmade bunniness.


Very straight forward and easy to do, these guys will add a little homeade flair to your baskets this Easter. Definitely give one of these little funny bunnies a try for the little ones in your life!!


Tuesday, April 19, 2011

Welcome to Monkey Sew Funky!!

Created as a spin off to Photographer ...Naturally, my original blog which consists of all my adventures while working to become a photographer, Monkey Sew Funky is taking over the arts! While it was fun having lots of topics on Photographer ...Naturally, I felt it would be easier and more organized to focus the blog strictly on photography and natural hair. So...all the artsy and foodie fun is making a move to this new location.  This blog will take over all the crafts, sewing, recipes, and everything artistic. So welcome!!  Time for tons of crafty fun :)

~Nik